
Drinking water tank leaking
Once you have solved one problem, the next one will appear to be working.
With reference to an earlier article in this series “How to sink a boat” this phenomenon appears to be caused by a leaking drinking water tank. While sailing with some waves a bottle fell over which was standing on the kitchen floor, I picked it up and saw the water sloshing between a crack in the floor, this shouldn’t be happening. A boat should have water on the outside and not loose on the inside. So after convincing myself that the water was not rising, I sailed on and anchored.
There appears to be a lot of water underneath again (see news article “How to sink a boat”). first test salty or sweet. It didn’t taste salty, so just to be on the safe side, we took seawater and yes, that was salty, clearly different. Ok drinking water. I could not find anything where that water came from anyway. After I emptied it, I still heard dripping at the bottom. I waited a while and yes, there was water underneath again and the dripping went on and on.
My water tank is a 315 ltr. Stainless steel tank, the previous owner cut a large hole in the top of the old tank, in which he lowered a special made-to-measure stainless steel tank, which lies tightly between the rebates and was fixed with a clasp of wood. Because this method was completely sealed off you can’t look under or in between, but there are no connections at the bottom, they are only on top. I suspect that because of the heavy seaway I have had, the tank started to shuffle and slide (one of the lips even broke off and had to keep it in place) which may have caused a hole or hole somewhere. It is no longer dripping and there is still water coming out of the tap, there won’t be much water in it anymore but how much is the question and so don’t fill it up further than the “hole” but how much. Just to be sure I bought a 15 ltr jerrycan today and filled it with water, I now have to wait until the tank is empty to know how much is left in it (only what is measured is what is going out, so you can’t read the level on a meter).
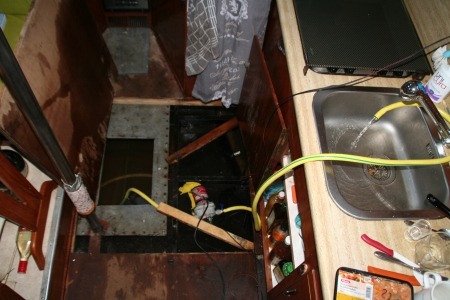
The tank will have to be removed, the teak dining area will have to be partly removed and experience has shown that this does not make it any better. I cannot, of course, do this along the way. Here is the process of renovation.
Renovation and restoration of old water tank
I started this job in the winter of 2016. The original water tank is an integral part of the hull, which was closed at the top. I removed the stainless steel tank that lay in the sawn hole. Then I made a steel plate of 5 mm to close that hole. This plate was welded by a professional welder. I made a manhole in this large cover plate. The part of the original water tank also had a manhole, but I couldn’t open it because the large mast, which was put on it later on, rested on a corner of it. But I had already cut a hole in it while filling up the water. See news report “How do you sink a ship?” So that becomes a manhole in a manhole. I had a flange made for this purpose, so I could close this hole with a lid. So now I again have a very large water tank with two accessible manholes.


The walls of the tank, which is actually the inside of the hull, are sanded clean by me and then cemented. This is a process that was often used in the past. A bag of cement from the Gamma for EUR 5.-, according to specifications, is sufficient for this. A bucket and dustpan are the tools. The mortar is made to buttermilk thickness and spread over the inside walls of the tank to allow it to dry, so do not heat it up too quickly. After a day or two, apply a second coat and you are done. The cement burns into the steel and forms a solid layer. It kills bacteria and is therefore extremely suitable for drinking water. Rinse the tank a few times before use. In this new tank I have installed a bilge pump with its own panel, so that I can dispose of my drinking water tank, which now contains 850 litres, at all times via the regular water outlet. This if the water is in there for too long. But with my use of permanent living on my boat, washing machine and shower I won’t need that often. The only disadvantage of this tank is that the water temperature is almost equal to the outside water temperature. Hence also the bilge pump.


Above is the order of processing. When filling the tank I had some small leakage on the flanges, but after tightening bolts ok. Now I don’t have to go to the side for drinking water and because of the generator I always have power, so to the side only for fresh fruit and vegetables.

